This project has been a
headache and extremely slow moving for being a project which was at the top of the to-do list as we pulled into our winter home here at Friday Harbor. I am happy to report I am sitting down below typing this in a dry and rather warm cabin, but the path to which we landed in this scenario didn’t follow a short path
There are a lot of options to heat your yacht. Especially here in the PNW, most boats have some sort of heating, usually in the form of a Dickenson Newport type diesel fireplace like S/V Mig rocks or even some boats have full diesel ovens used for cooking and heating like our friend Evan over in Victoria aboard S/V Amaryllis. The other option sometimes gone for is the full actual wood burning stove such as on S/V Swirl here in the bay. These are great but require quite a lot of interior setup as well as the actual install. As our boat has no prep done for a heater to be installed of any kind anywhere, these would have been quite the undertaking, not to mention expensiveeeee.
We knew from the get-go we were going to be installing a forced air diesel heater. These are smaller, don’t require a full chimney out the cabin top, use very minimal diesel, and aren’t meant to be installed in full view of the salon but more tucked away with an airduct or two directing the new warm air into the cabin. We carry up to 100 gallons of diesel onboard Karma and with our small but mighty Yanmar 2QM20 engine sipping but half a gallon an hour at 2700rpm it would take us about 3 years to go through a full tank. Our 400 amp hours of lithium batteries are used to run about 15 lights and charge a laptop so the 1 to 2 amps of power used to keep the heater running is not of any significance which is usually an advantage of the Dickenson gravity fed stoves which use no power.
Installing a forced air diesel heater has a few components which all seem pretty straight forward until you sit down in your boat and have to figure out where everything actually connects. There is a wiring harness included which is completely straight forward as it is 3 connectors all strung together, one for the controller (think on and off, hotter or not), one for the fuel pump, and one for the actual heater, and it then ends with a free positive and negative wire to connect to your fuse block. There is the fuel line which, you guessed it, takes diesel from wherever it is you’re storing that to the pump, which pumps it then to the actual heater. The last thing you have to worry about then on a boat is the exhaust, which is the same as would be coming out of a diesel truck. This has a limit on length as too long would create back pressure, but also as it gets extremely hot, has to be routed carefully outside the boat somehow. The exhaust turned out to be what made the puzzle of where to mount this thing more difficult than originally intended.
Before purchasing we were thinking “easy, we have lots of space under the aft bunks, we will put the heater there, run the exhaust out the stern next to the Yanmar’s exhaust, and the heat will go directly into the salon”. Oh how naive we were. The issue with this became apparent once I made a little stand and ran the heater just standing under the companion way steps for a bit. The heat of the exhaust pipe. Running this through the boat such a long distance would make a lot of unusable storage space as things couldn’t bump up against it. The other issue is it’d be an exhaust run of 10+ feet which I couldn’t find exhaust hose that long (which we now know is due to the recommended length being less 2 meters or less). At this point we were forced to rethink, and all this caused delays in any actual progress being done.
Christmas came and went, I (Liam) was away from Karma for 3 weeks in California and Heather was posted up on Shaw Island then down in Seattle for the festivities. Of course during this time was when Friday Harbor experienced its one week of abnormally cold weather and we had 2 or so feet of snow aboard, lowering our waterline and slipping up the decks.
A lot of boat projects have a pushing rope feel to them as small details add up in such a way that projects seem to take 50% of their time at the 5-10% finished mark. Once back onboard in the new year it was time to get serious about this as the parts have now been laying around for a while but we were not heating Karma with diesel but still our trusty Sebo’s electric space heater. With a lot of time pondering the heater’s placement over the break, my thought coming into it now was, “okay, so the exhaust is sorta limiting, lets put the heater way in the stern, just behind the transom where there is a bit of a space, the exhaust can be all but a foot long and go straight out the transom, and we can then duct the heat (in a 3″ but less hot tube) into the cabin from there.”

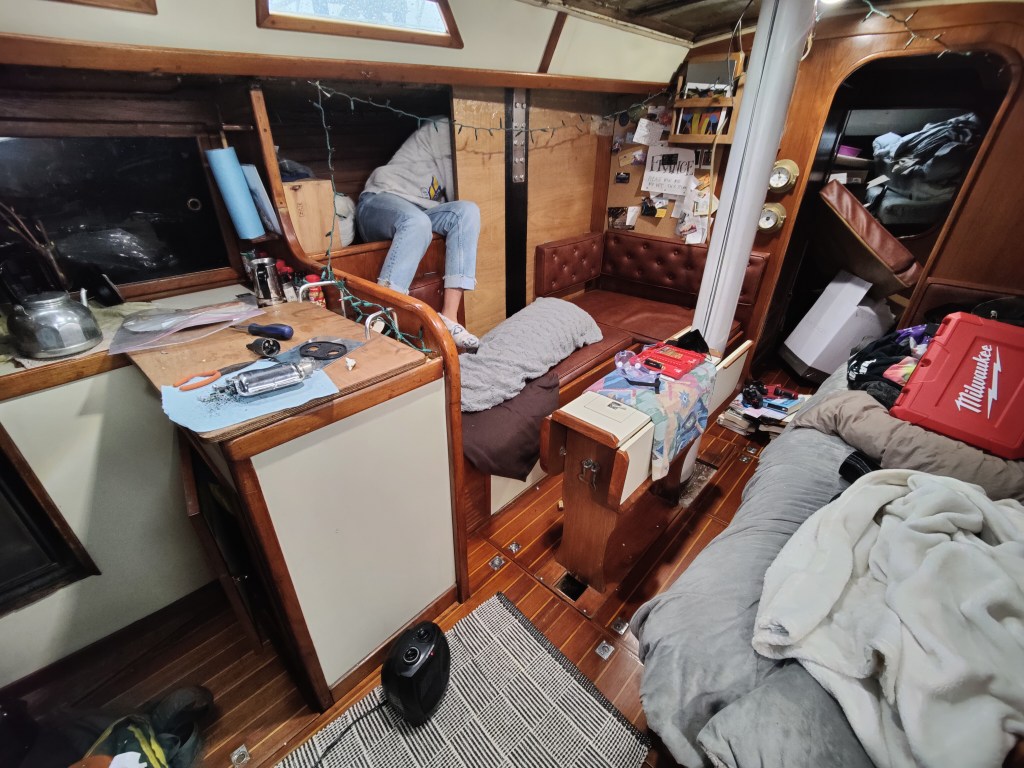
As you can see above, I did quite the deep dive into the aft locker to do some preliminary mounting and planning for where to run some ducts. While it was good to air out everything in the ‘garage’ so to speak, it left me more annoyed as this plan I had been dwelling on was likely to be far more complicated than I had hoped. The flat space I was picturing wasn’t existent, and the distance we would have to run the duct carrying the heat was far further and more in the way than I had thought. We had used the heater just sitting it outside and ducting it inside for a few days and having corners in the ducting does make a difference in how much heat comes out the end. The other thing with this plan was the heat would exit into the cabin in the far aft of the boat which means it would likely take longer to heat up the main area. All of this had me once again inside pulling apart lockers and brainstorming and essentially starting from scratch on a plan, again.
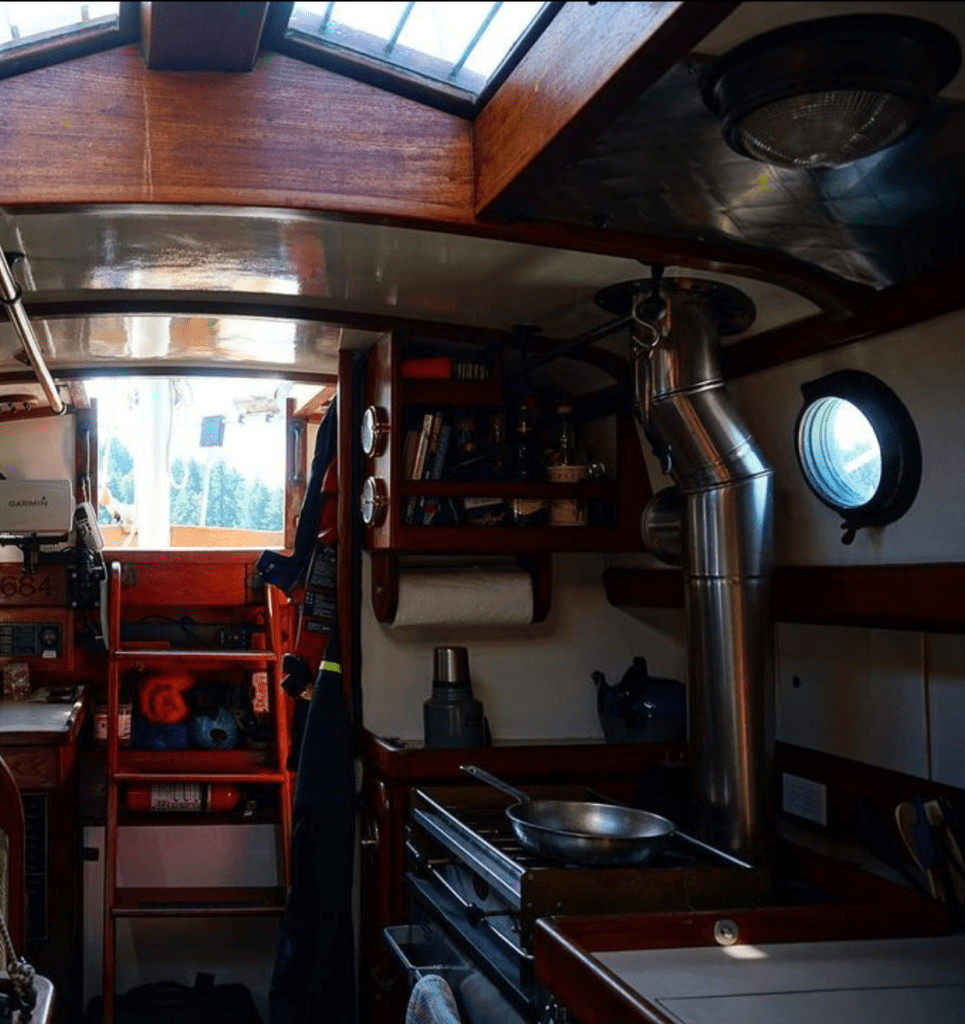
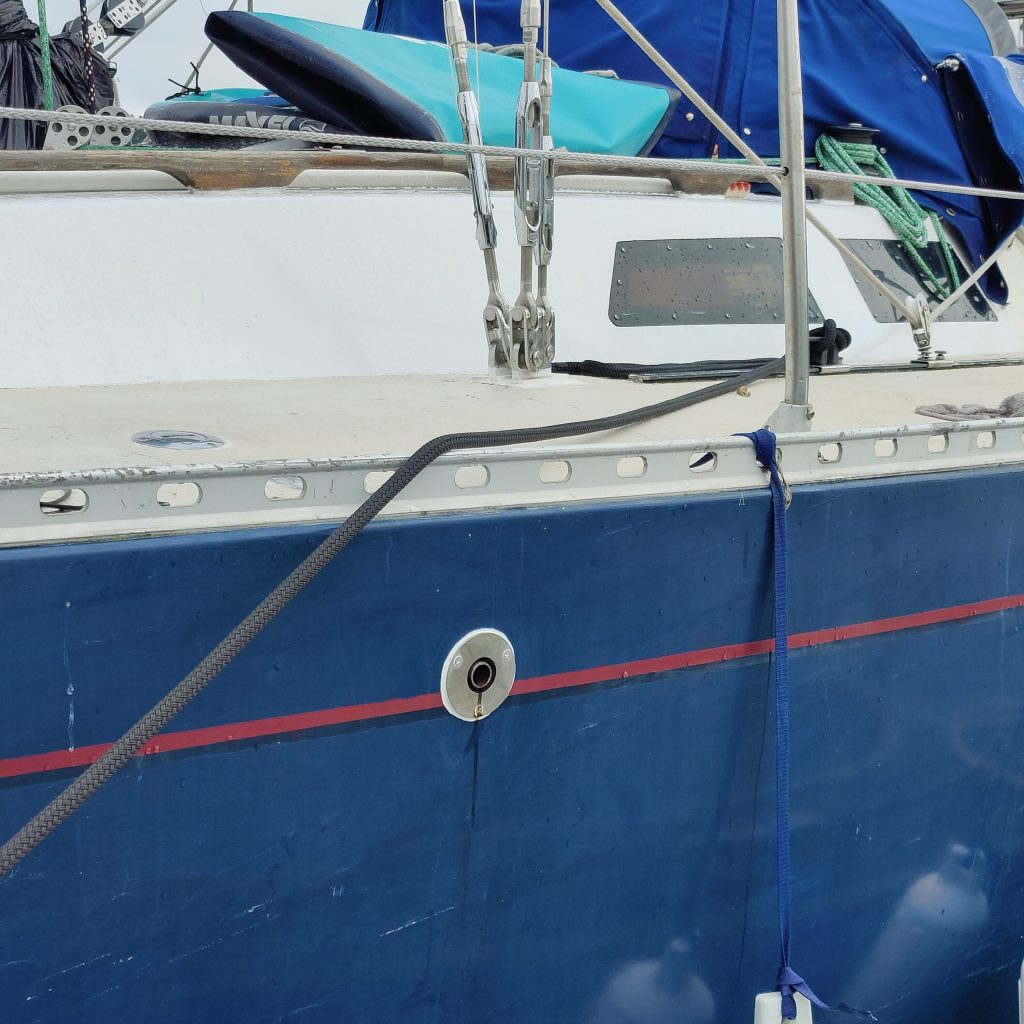
Armed with now the limitations, the answer was going to come in some form of midships exhaust exit, then the heater being in a locker inside the main cabin somewhere. Short exhaust but compromising on it being not at the stern, and heat right into the cabin but taking up some storage space by the heater itself as well as where the exhaust ends up running as well as the heat ducting. After much deliberation we decided the best spot would be behind the port chainplate as far forward as possible. Placing the heater here is the best in terms of limiting all those compromises. The heater is right in the saloon, it is behind the forward seat back cushion you can see below which is a strange and small shaped locker due to the shape of the boat, so not much storage loss. The exhaust runs straight up from there and out the hull which, as we are planning to add shelving to that sea berth, won’t get in the way of essentially any storage.
Okay so it begins. Really the project involves a reasonable number of steps:
- Mount the heater to the underside of what is the berth
- Drill 3″ hole for the exhaust to come up from under the berth where the heater is
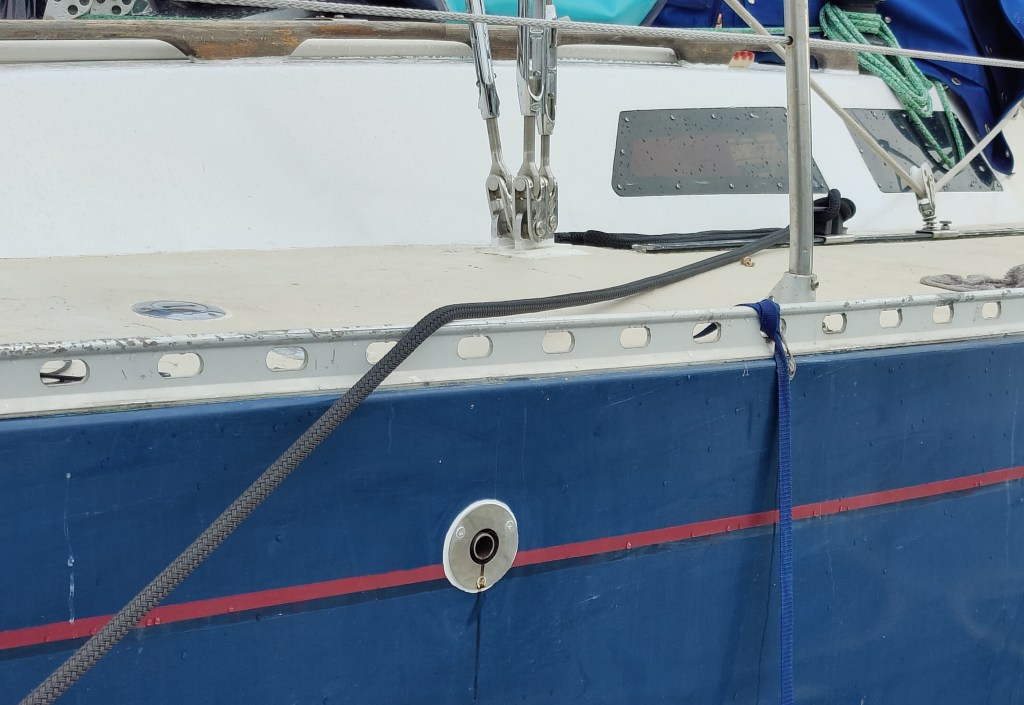
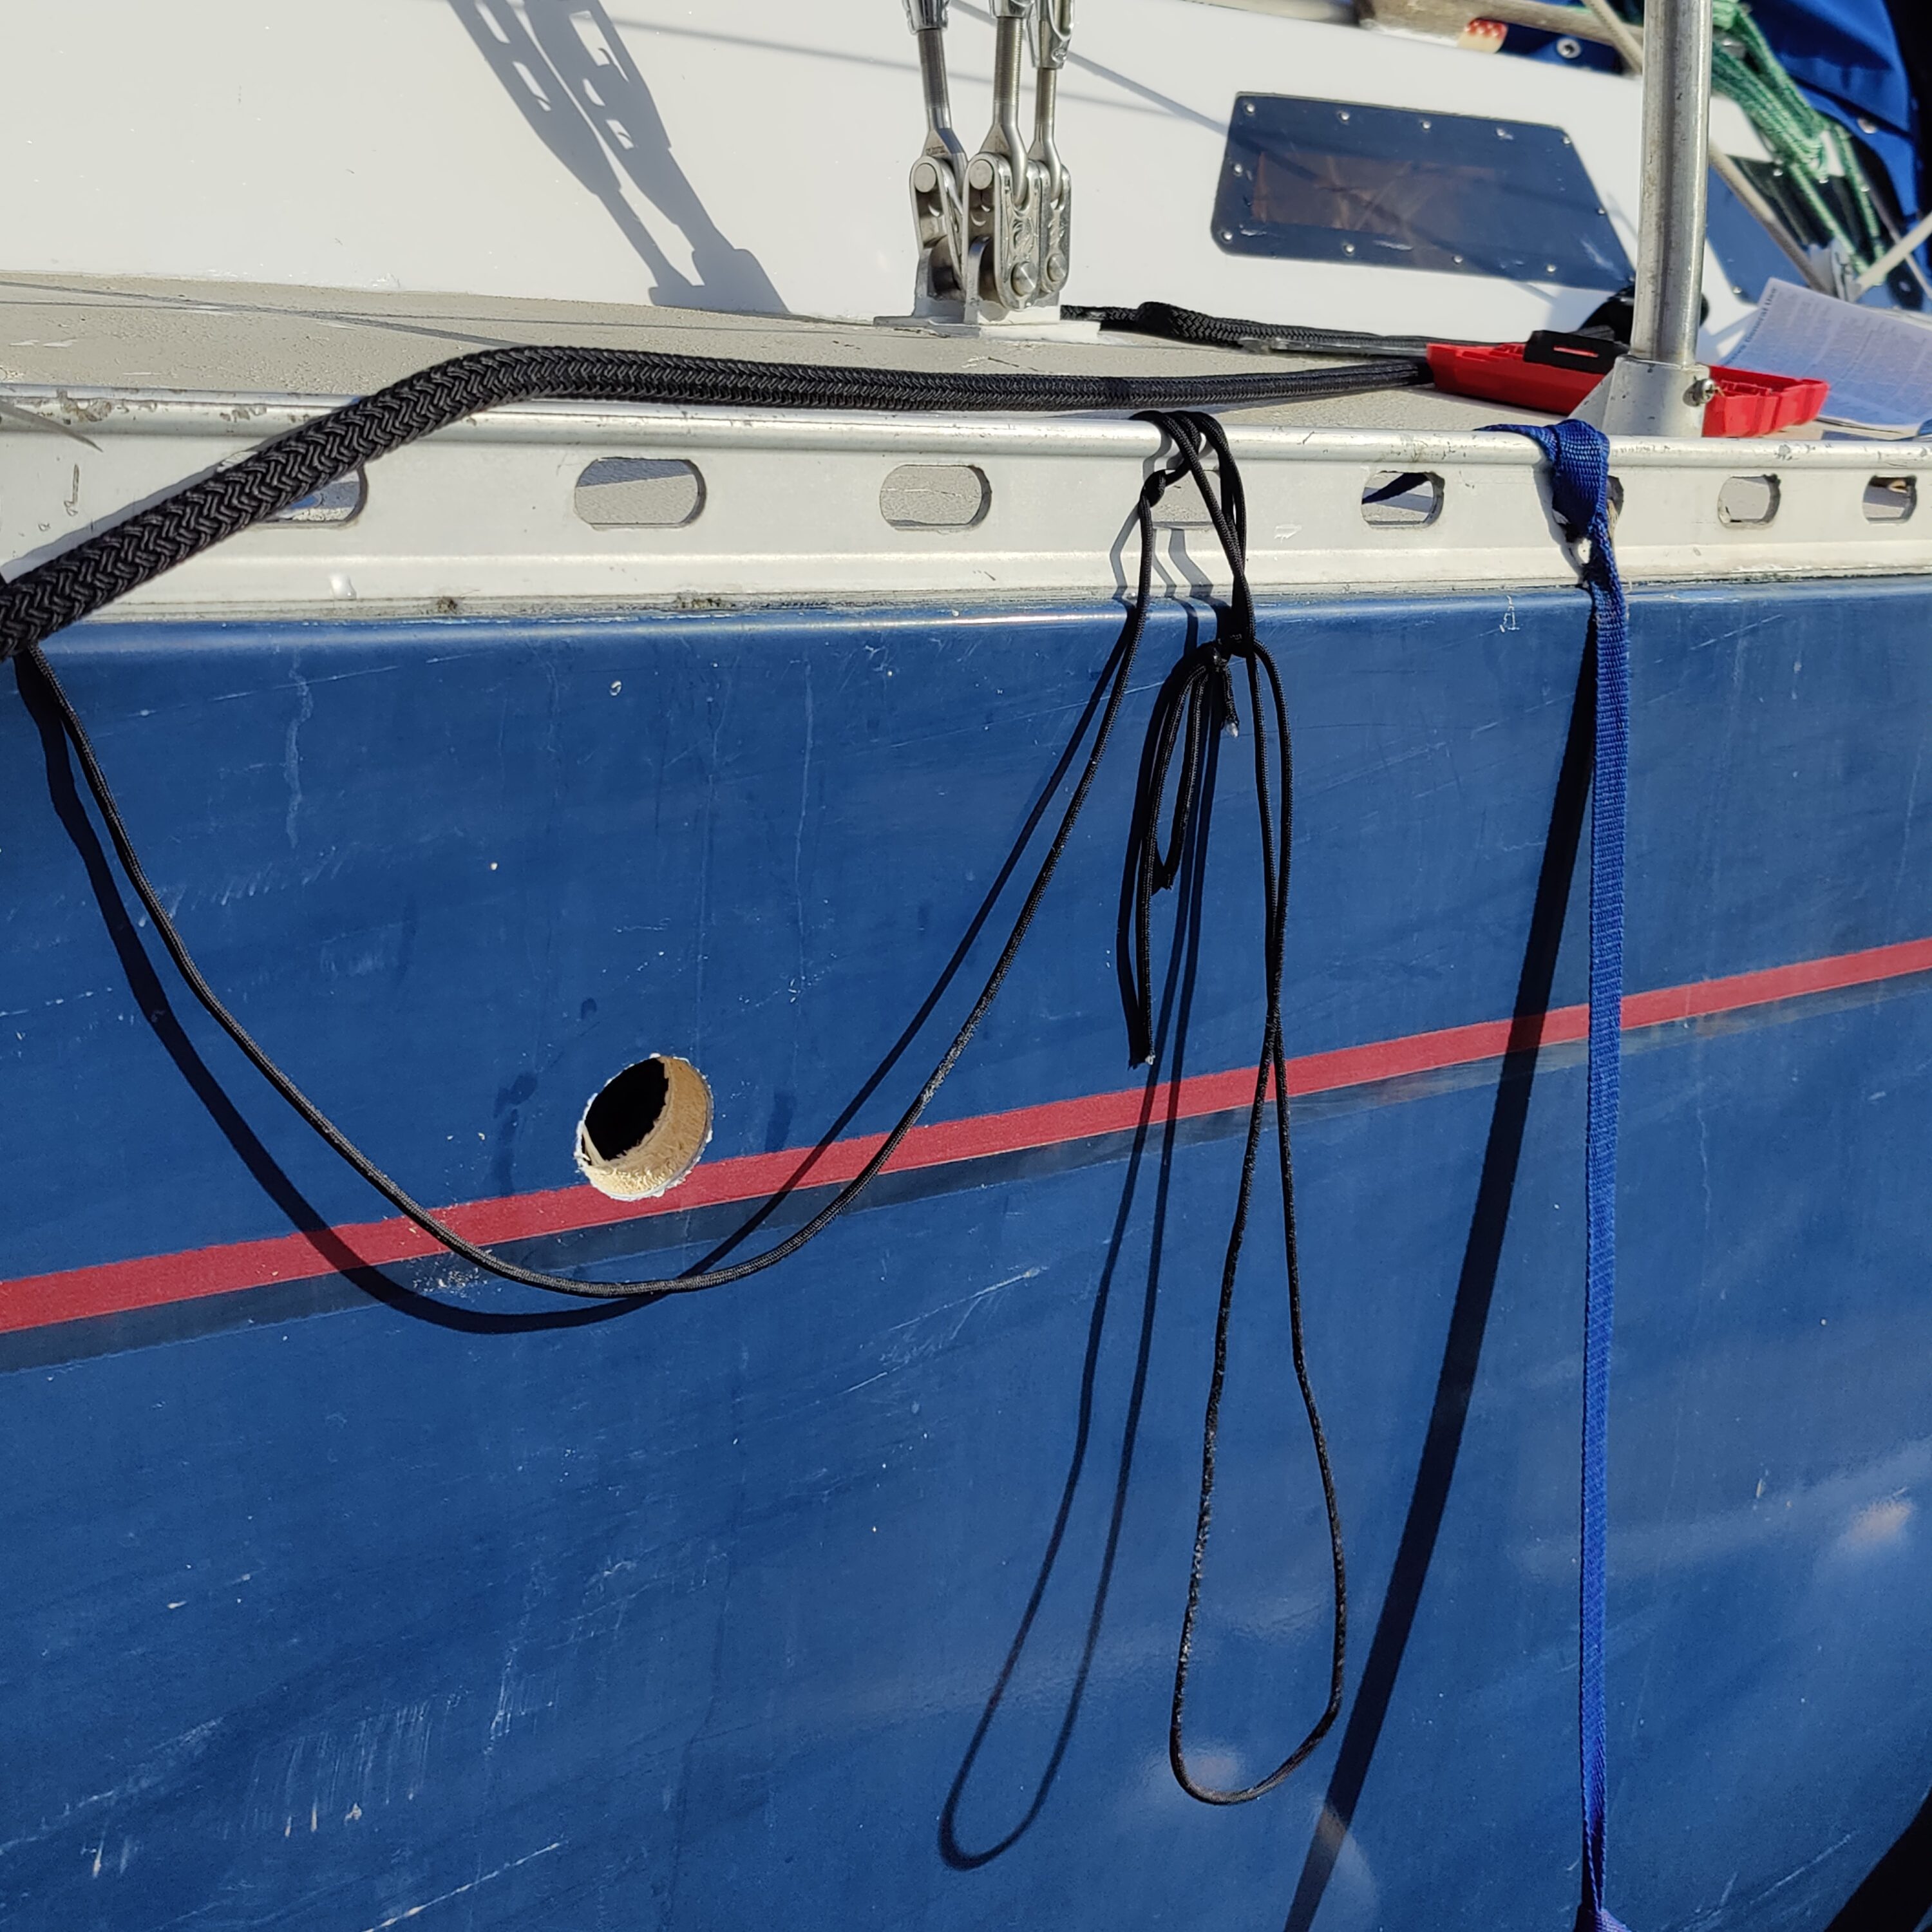
- Drill 1.5″ hole in hull for the exhaust outlet
- Wrap exhaust pipe in fiberglass insulation
- Run diesel line from tank to heater
- Run wires to pump, heater, and controller and connect to the fuse block
- Tighten everything together, get warm
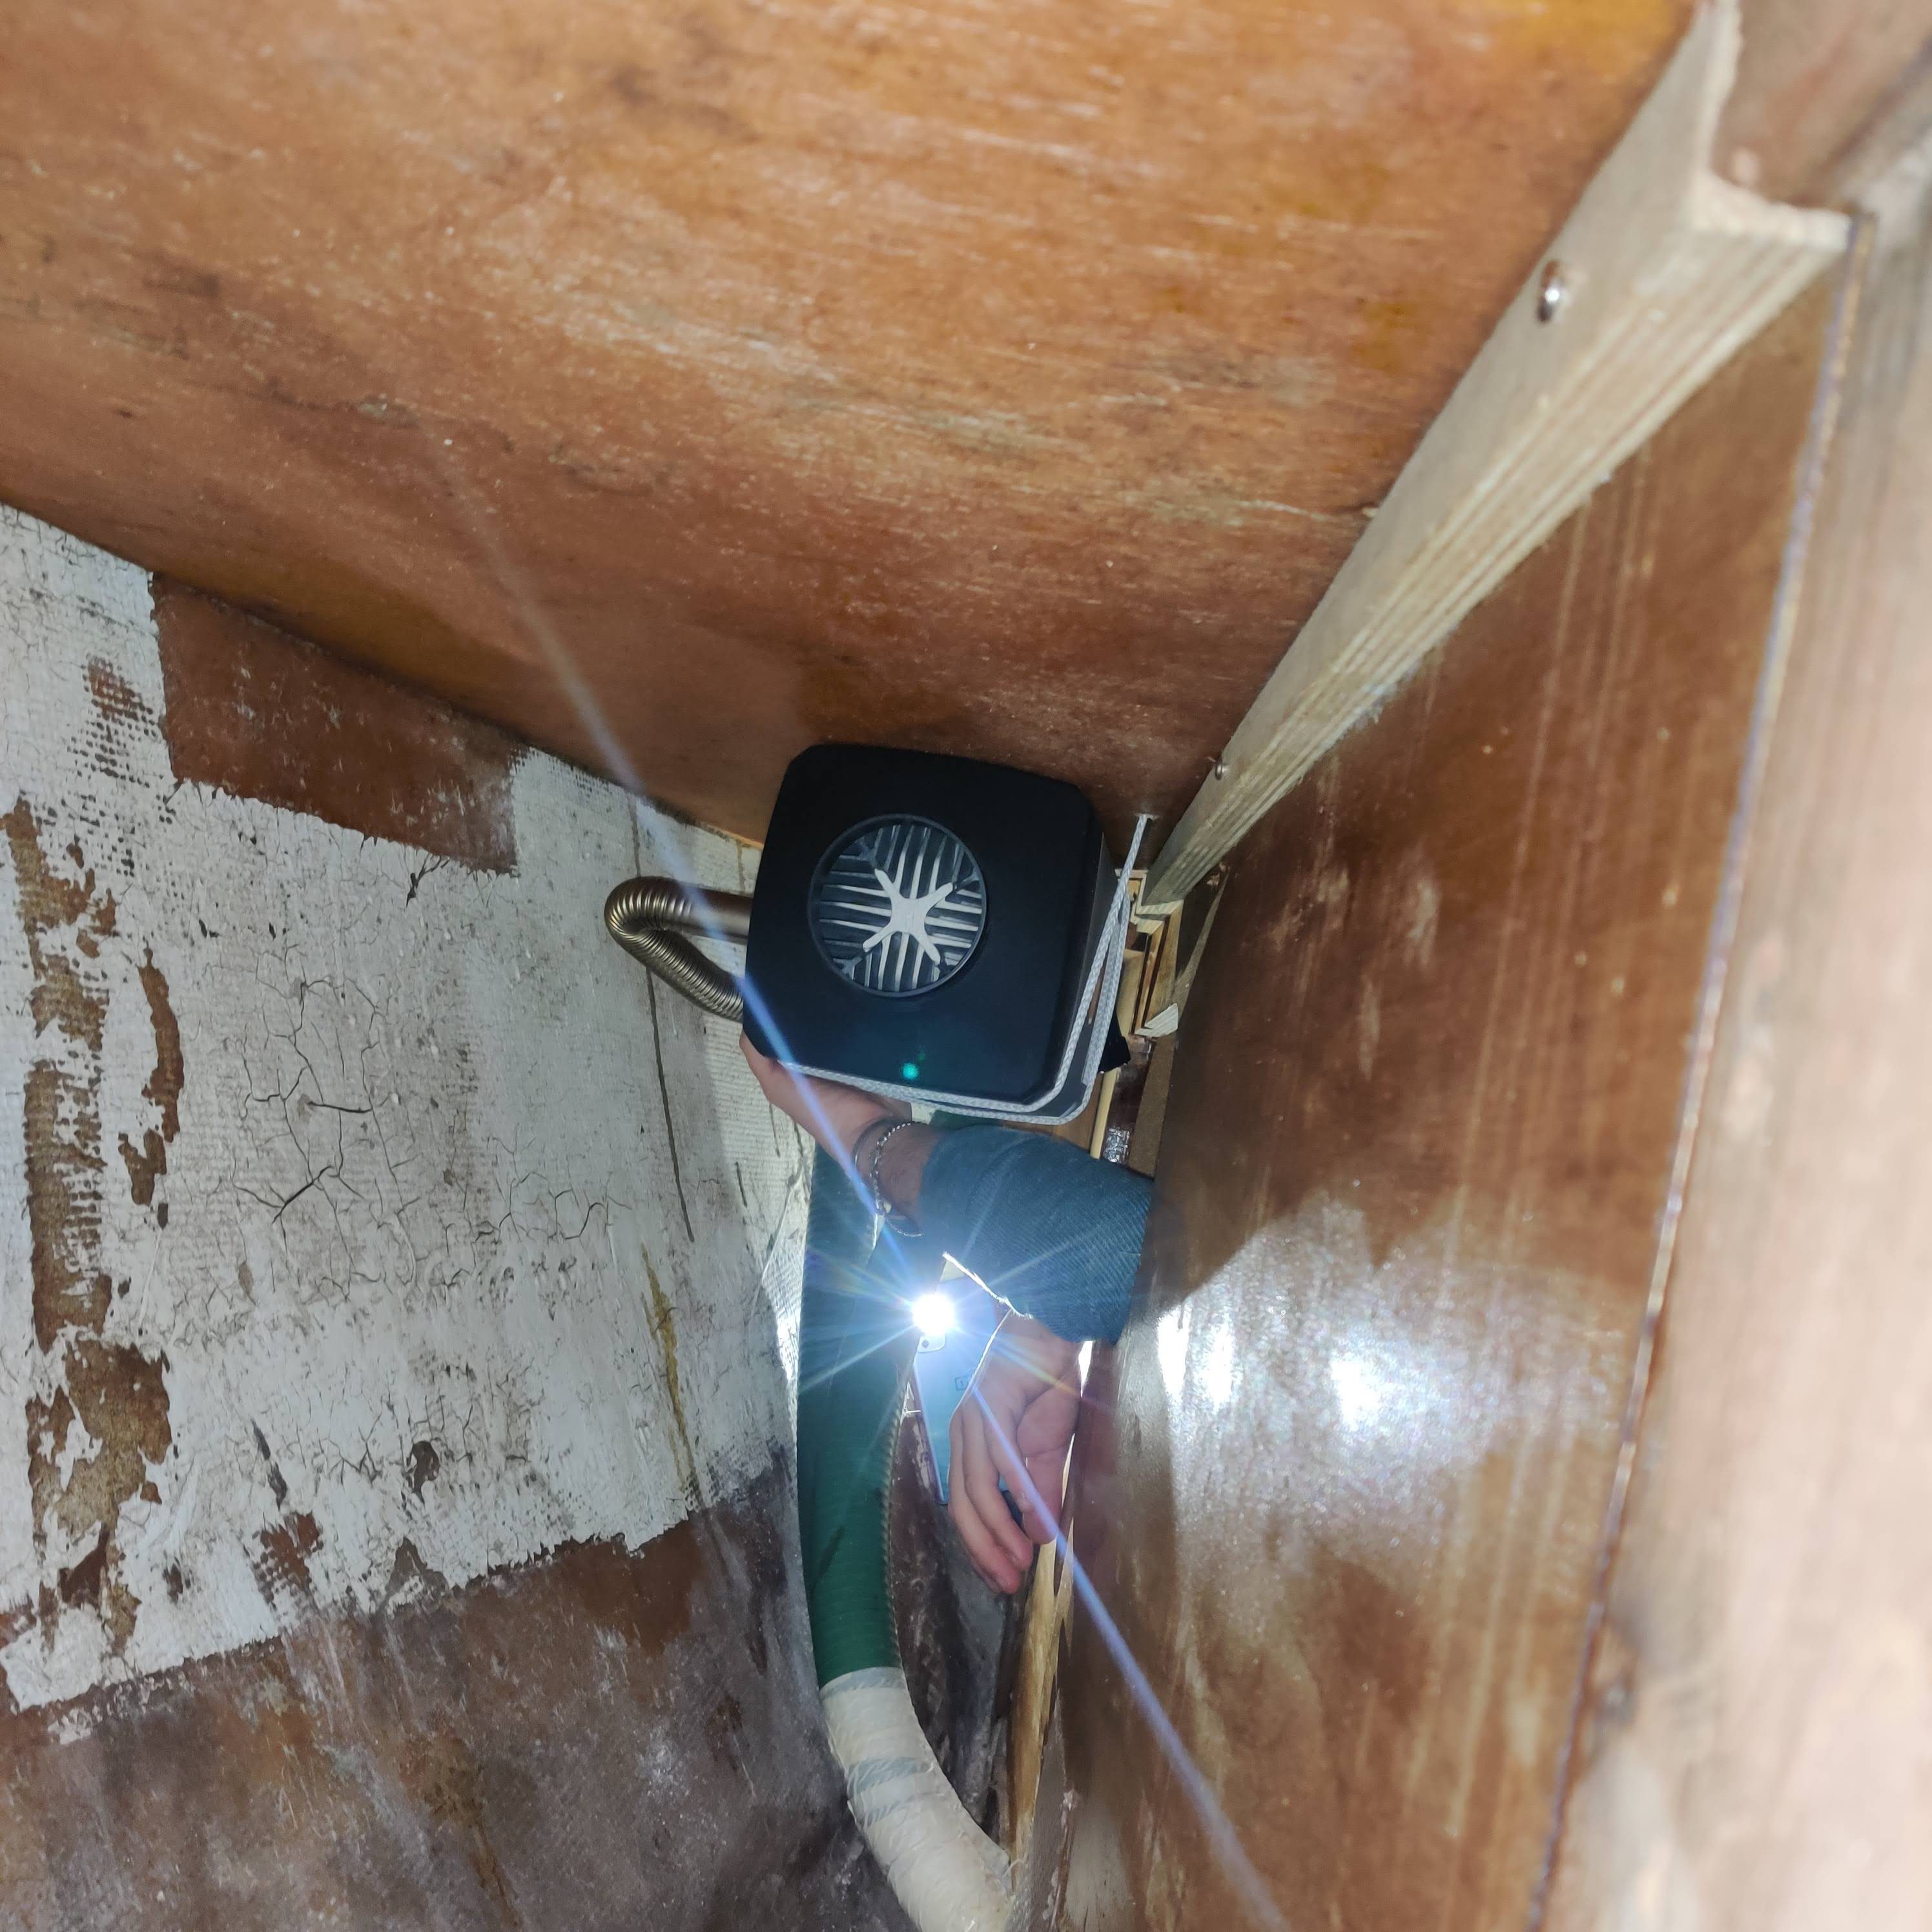
Non of that is particularly difficult, but this is where another aspect of boat projects comes into play, where it is all that stuff has to happen. More specifically, in small tight corners that you fit just 80% into. You can see below the sort of working conditions I was jammed into for what seemed like about a year while drilling, bending, measuring, epoxying and all that. The added bonus of fiberglass dust everywhere which is like leaning on tiny shards of glass is the kicker to make the whole experience a true boat project.
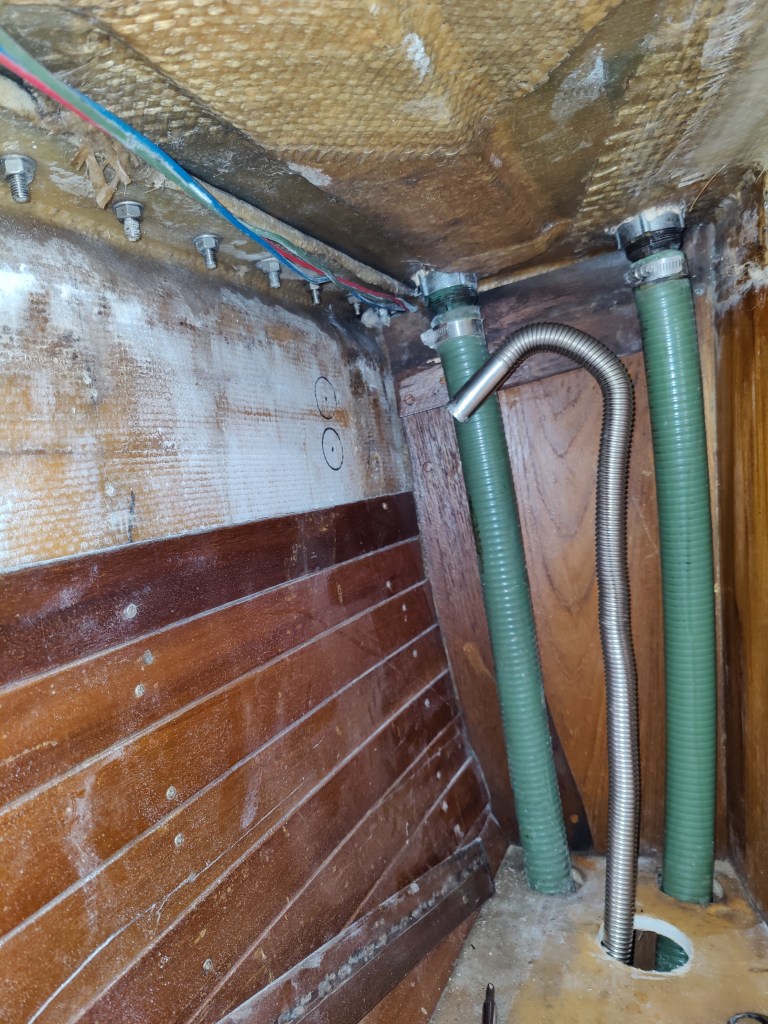
The main concern with this type of heater really is the exhaust. Both that the exhaust pipe is hot as well as that the exhaust in the pipe is toxic if leaked into the boat. Planning the heater’s placement around the best possible scenario for the exhaust really makes a lot of sense. We replaced the included hose-clamps with fancy pantsy exhaust hose clamps which are way more solid and get significantly tighter in an even fashion around what they’re clamping. We also used Permatex which is like a sealer that heats up on initial use and stops gasses escaping. Of course, there is also a carbon monoxide monitor in the locker with the heater as well and we have yet to measure any CO at all! We used a forstner bit to drill the large hole you see above where the exhaust comes up from the heater, then used a regular hole saw to drill the actual hole through the hull seen below.
Drilling straight through Karma felt a bit strange but it was pretty straight forward and is cool to have done it. We drilled the large whole and then three smaller ones for the bolts which secure the thruhull. After we drilled these holes we filled them all the way with epoxy and let that set while we did the rest of the jobs such as routing the wires and diesel line. We then drilled through again with slightly smaller bits so the coring is totally sealed even if water squeezes its way past all the EM4000 we used to seal the thruhull when we tightened it up.
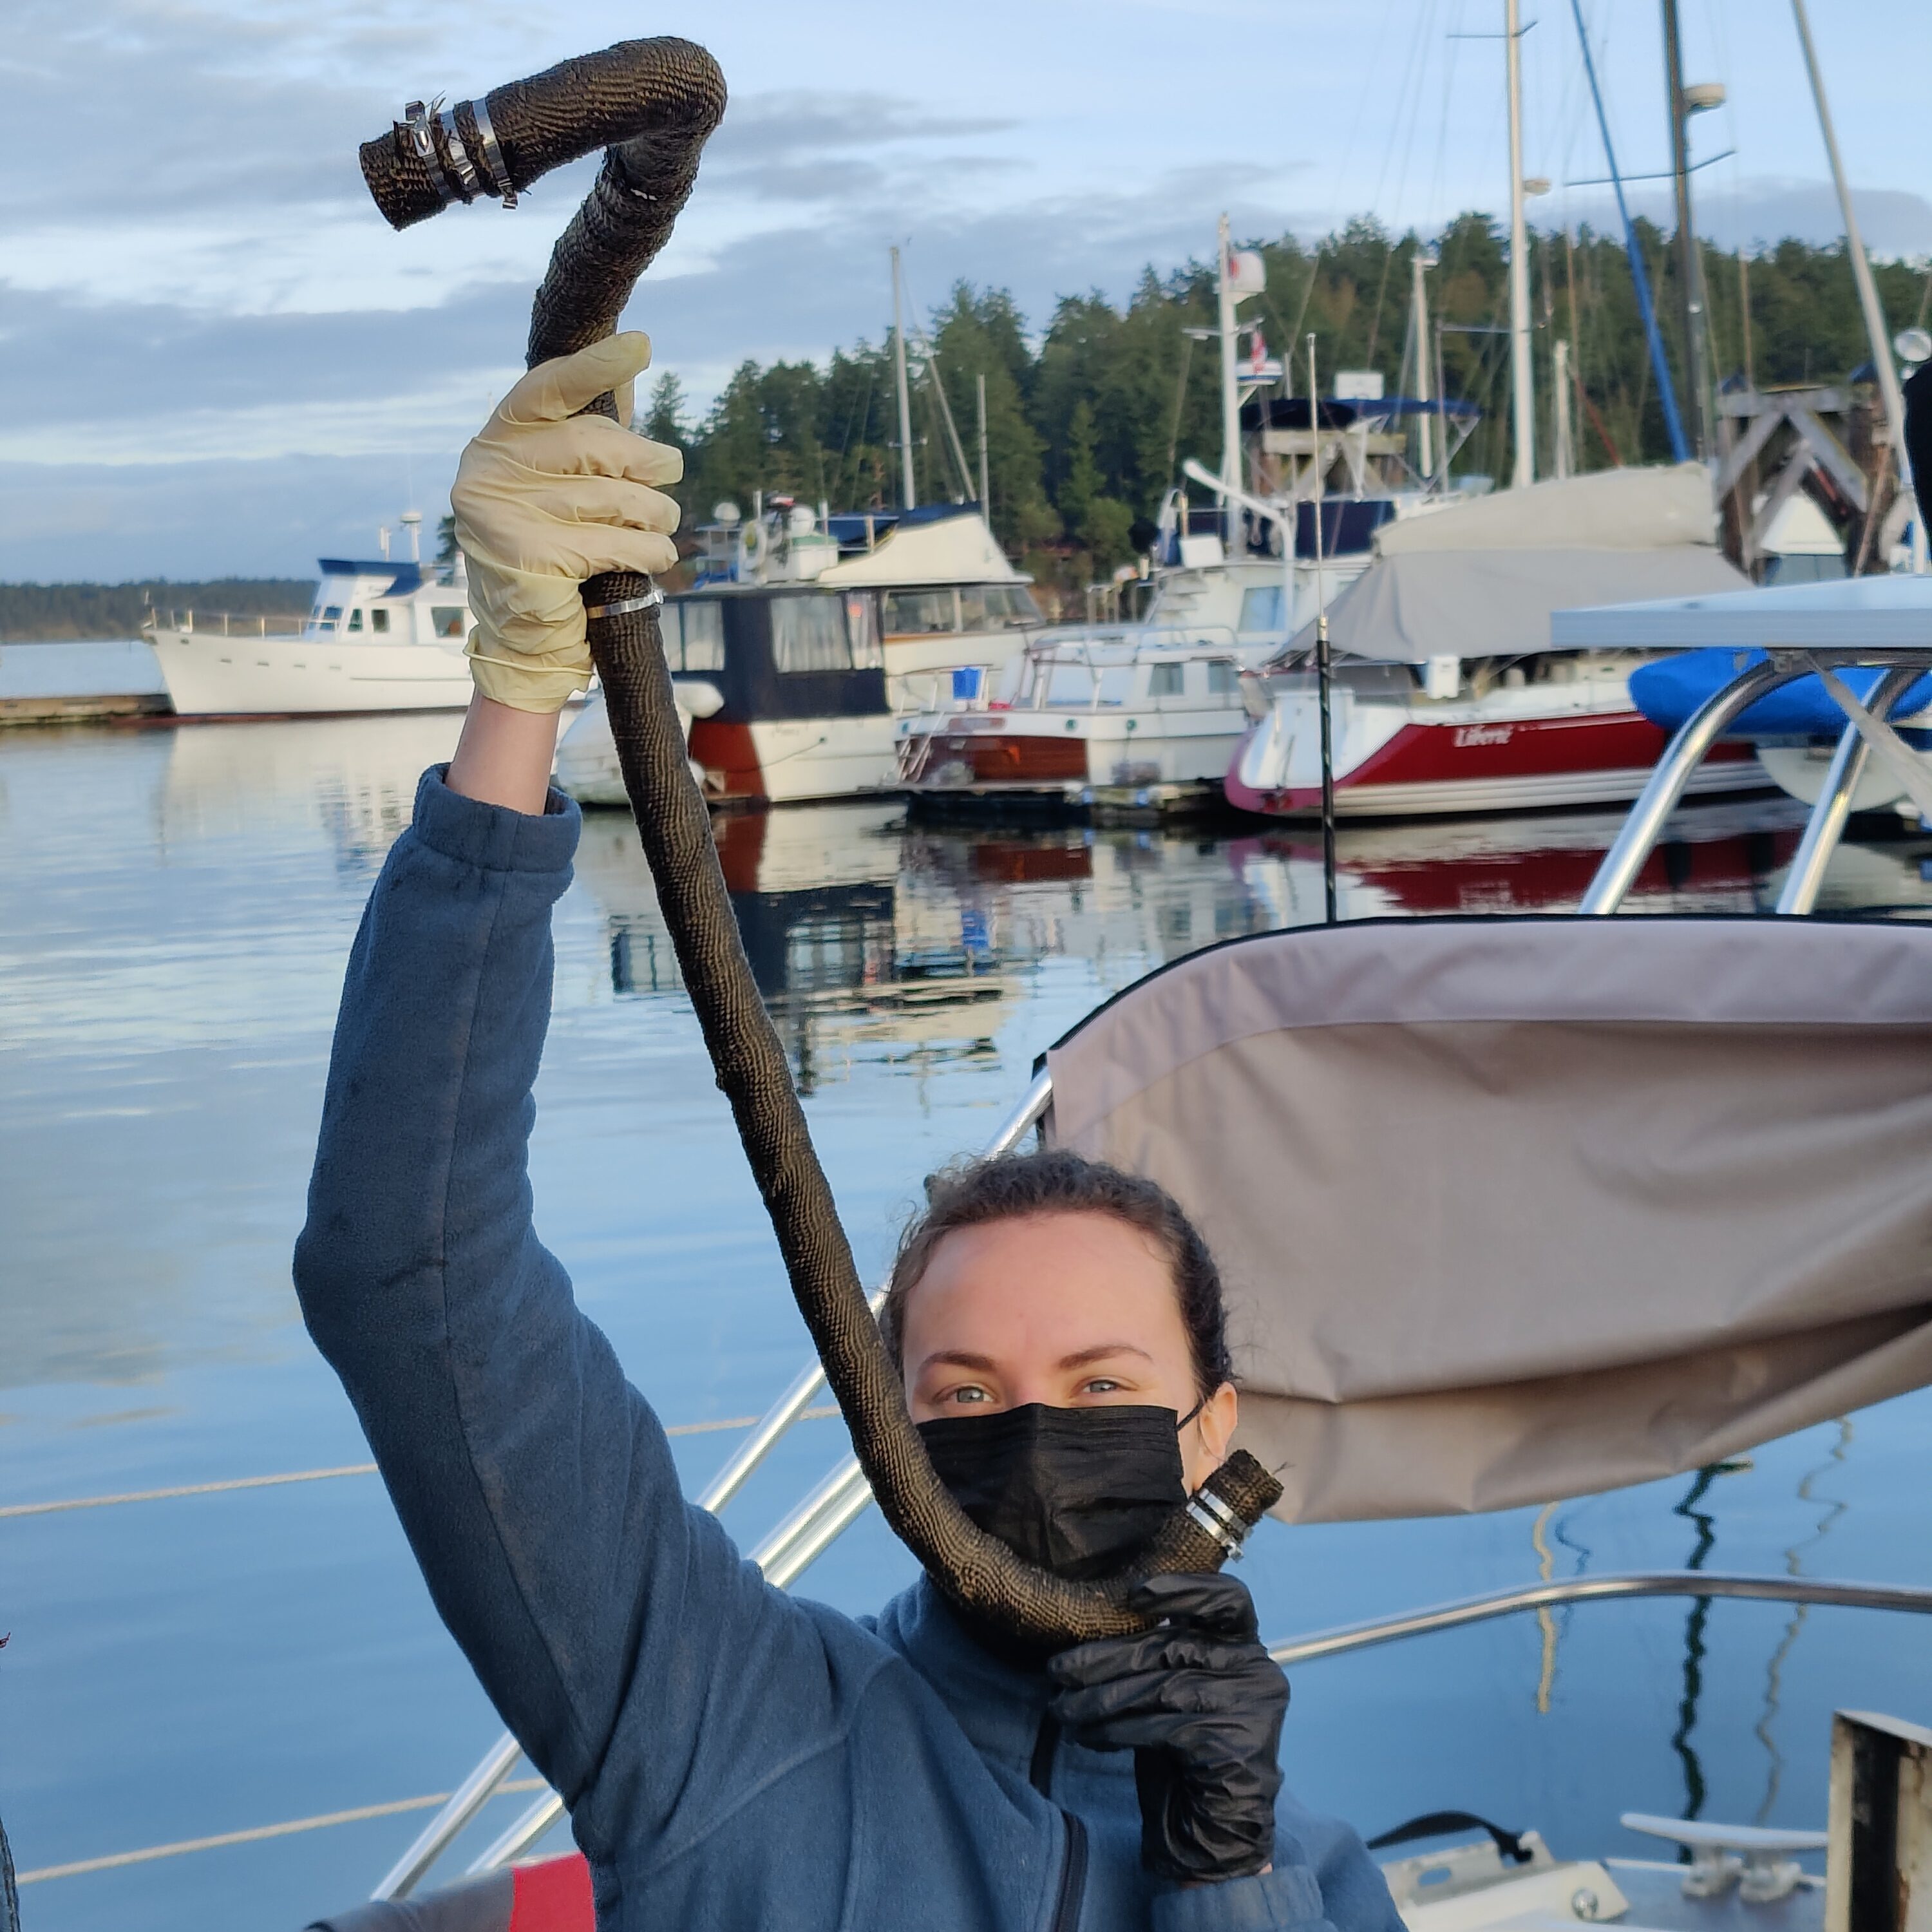
Insulating the exhaust was an interesting job. I cannot wrap a single layer of electrical tape evenly around a wire so Heather was on the case for this part. She did a supreme job after much frustration of fiberglass fibers everywhere and wrapping and rewrapping to get an even and tight finished product. While still too hot to grab onto for example when the heater is running, you can touch it briefly and even a 1/4th inch away you can’t feel the warmth. A huge reduction in heat. It also now doesn’t make any of the surrounding area anything more than slightly warm to the touch which means we can leave the heater on for ages and not think about it.
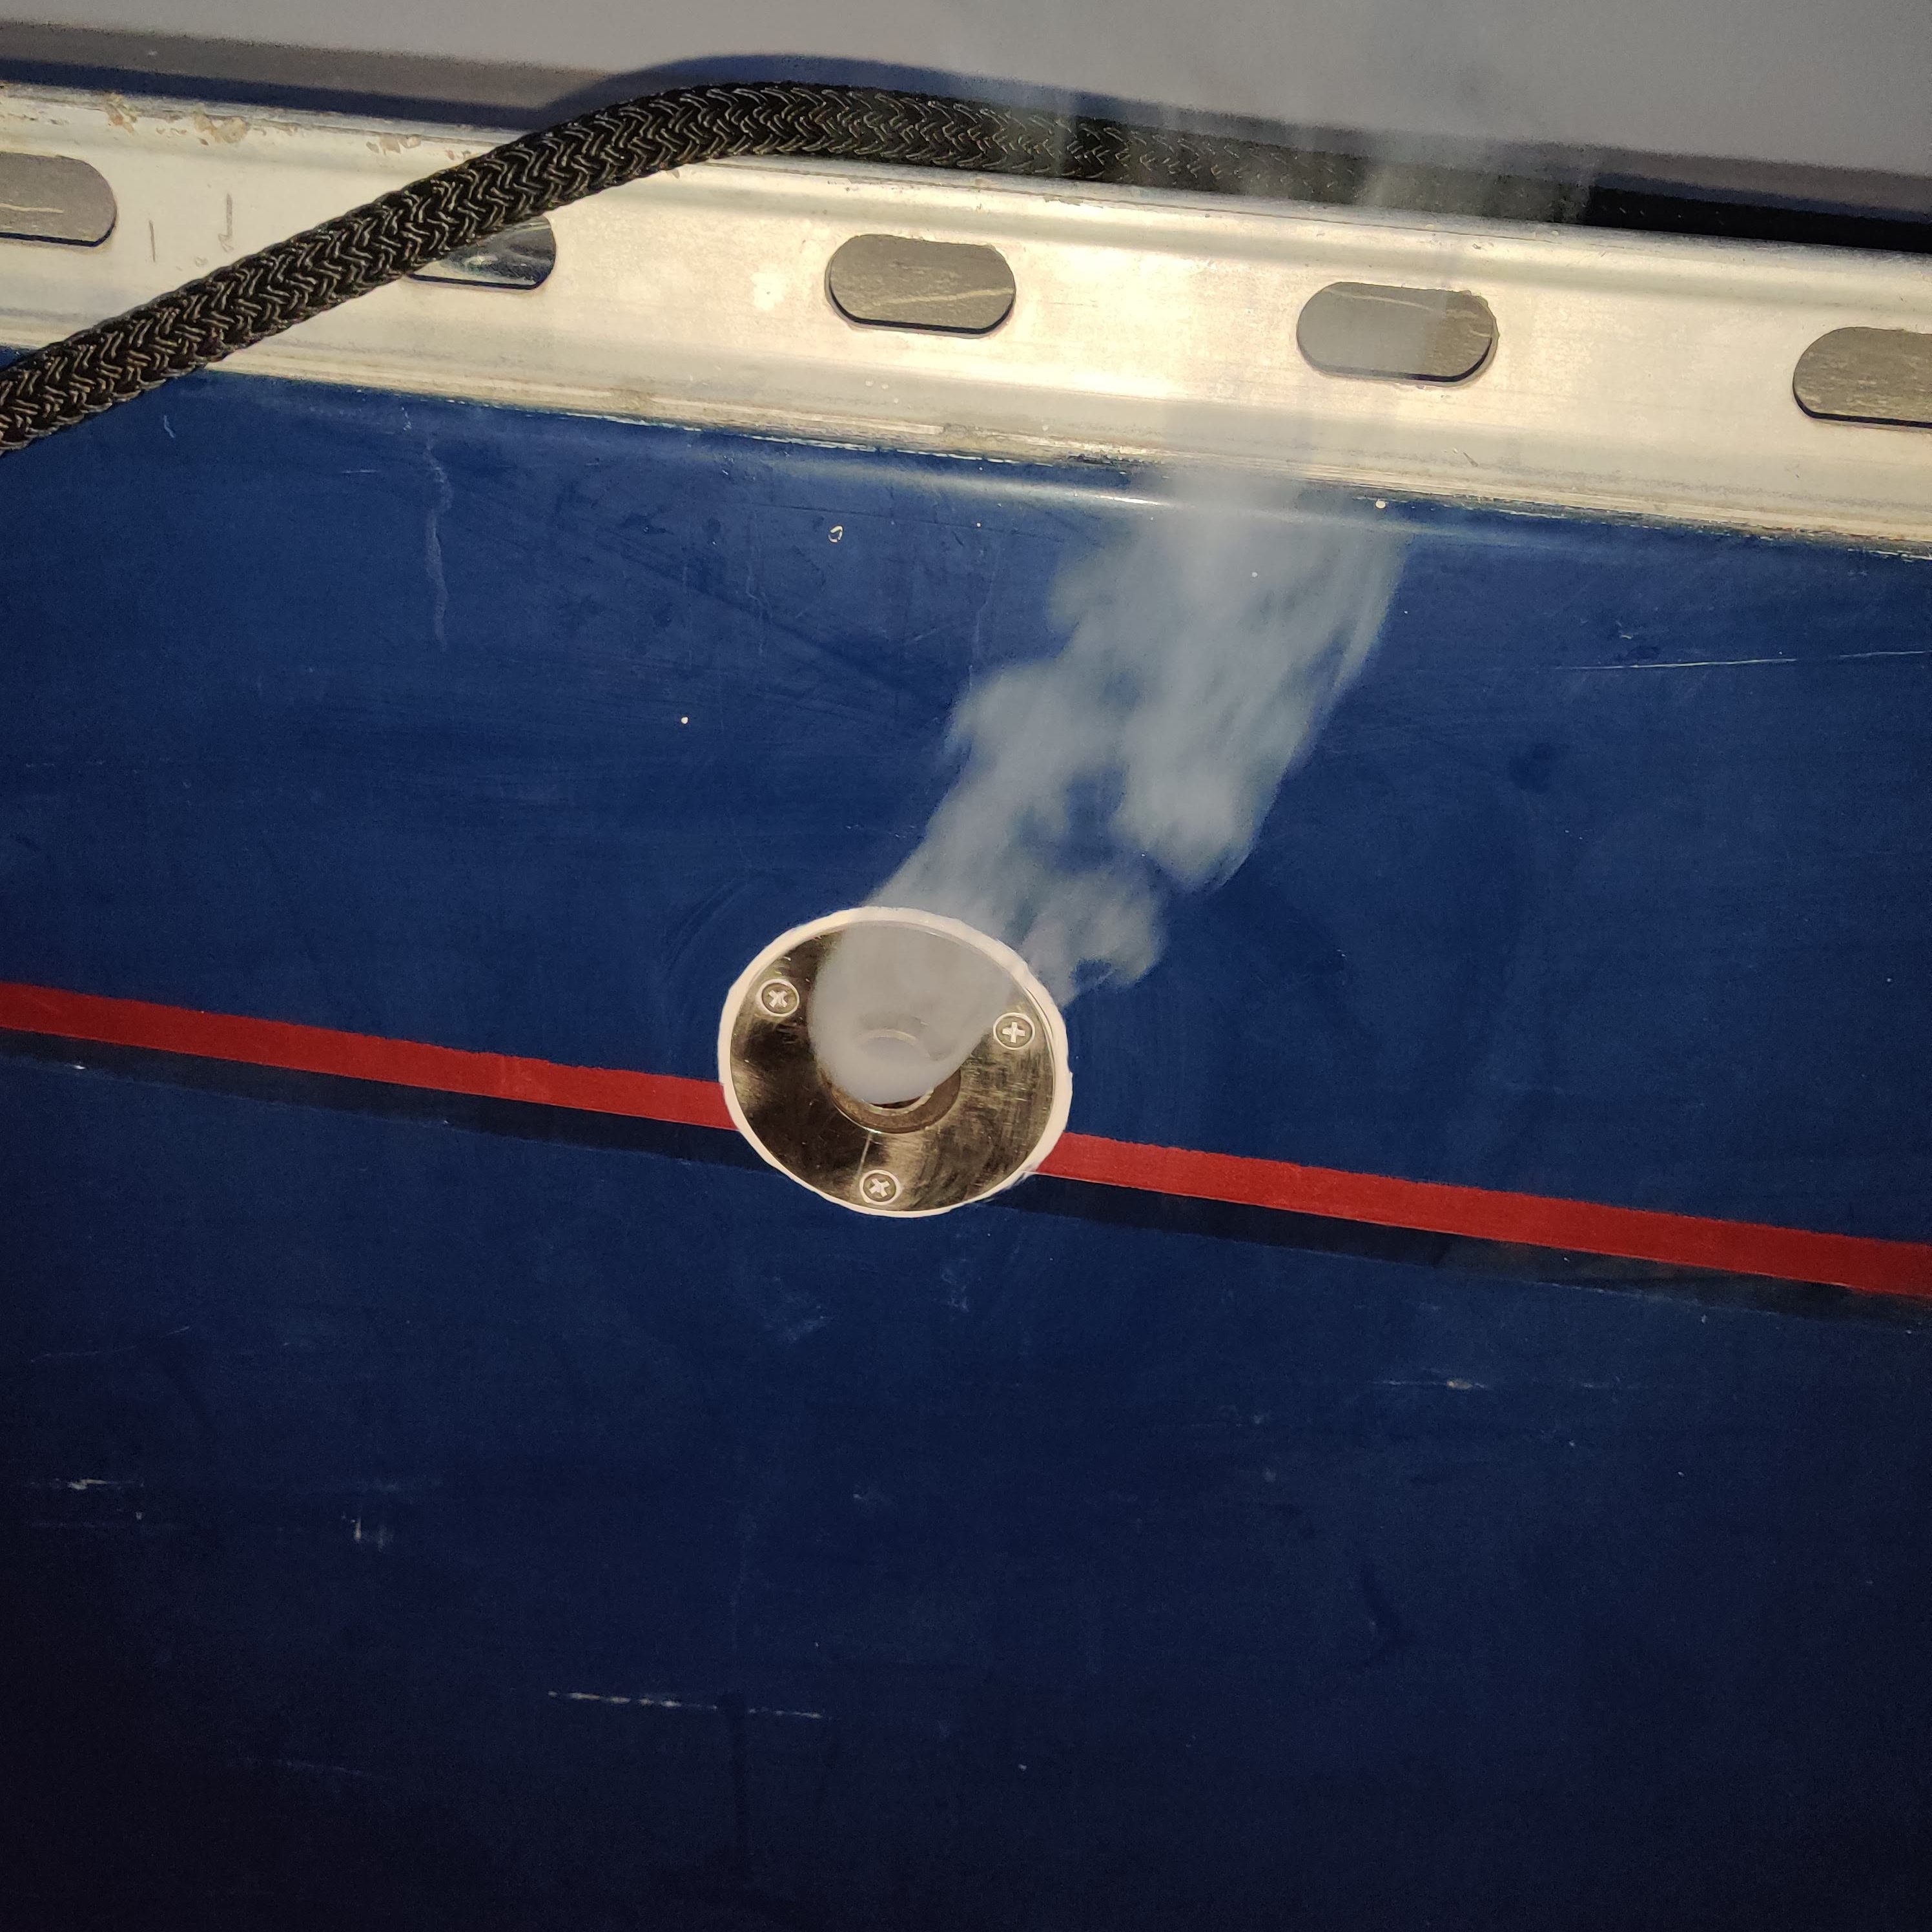
Initially, after all this work, an issue we were worried about cropped up again. In between installing it and just having it laying around, I tried to run it in a sorta-installed fashion and it would never light. We would get white smoke out of the exhaust, indicating diesel was being burned but not hot enough to make any sort of combustion happen, and the heater would not get hot enough to actually run. When dismantling this dodgy install for the proper installation, I was also looking into what causes this error. I found the issue stems from unclear exhaust runs, essentially too complicated of bends, too long of an exhaust run, or blockage in the exhaust.
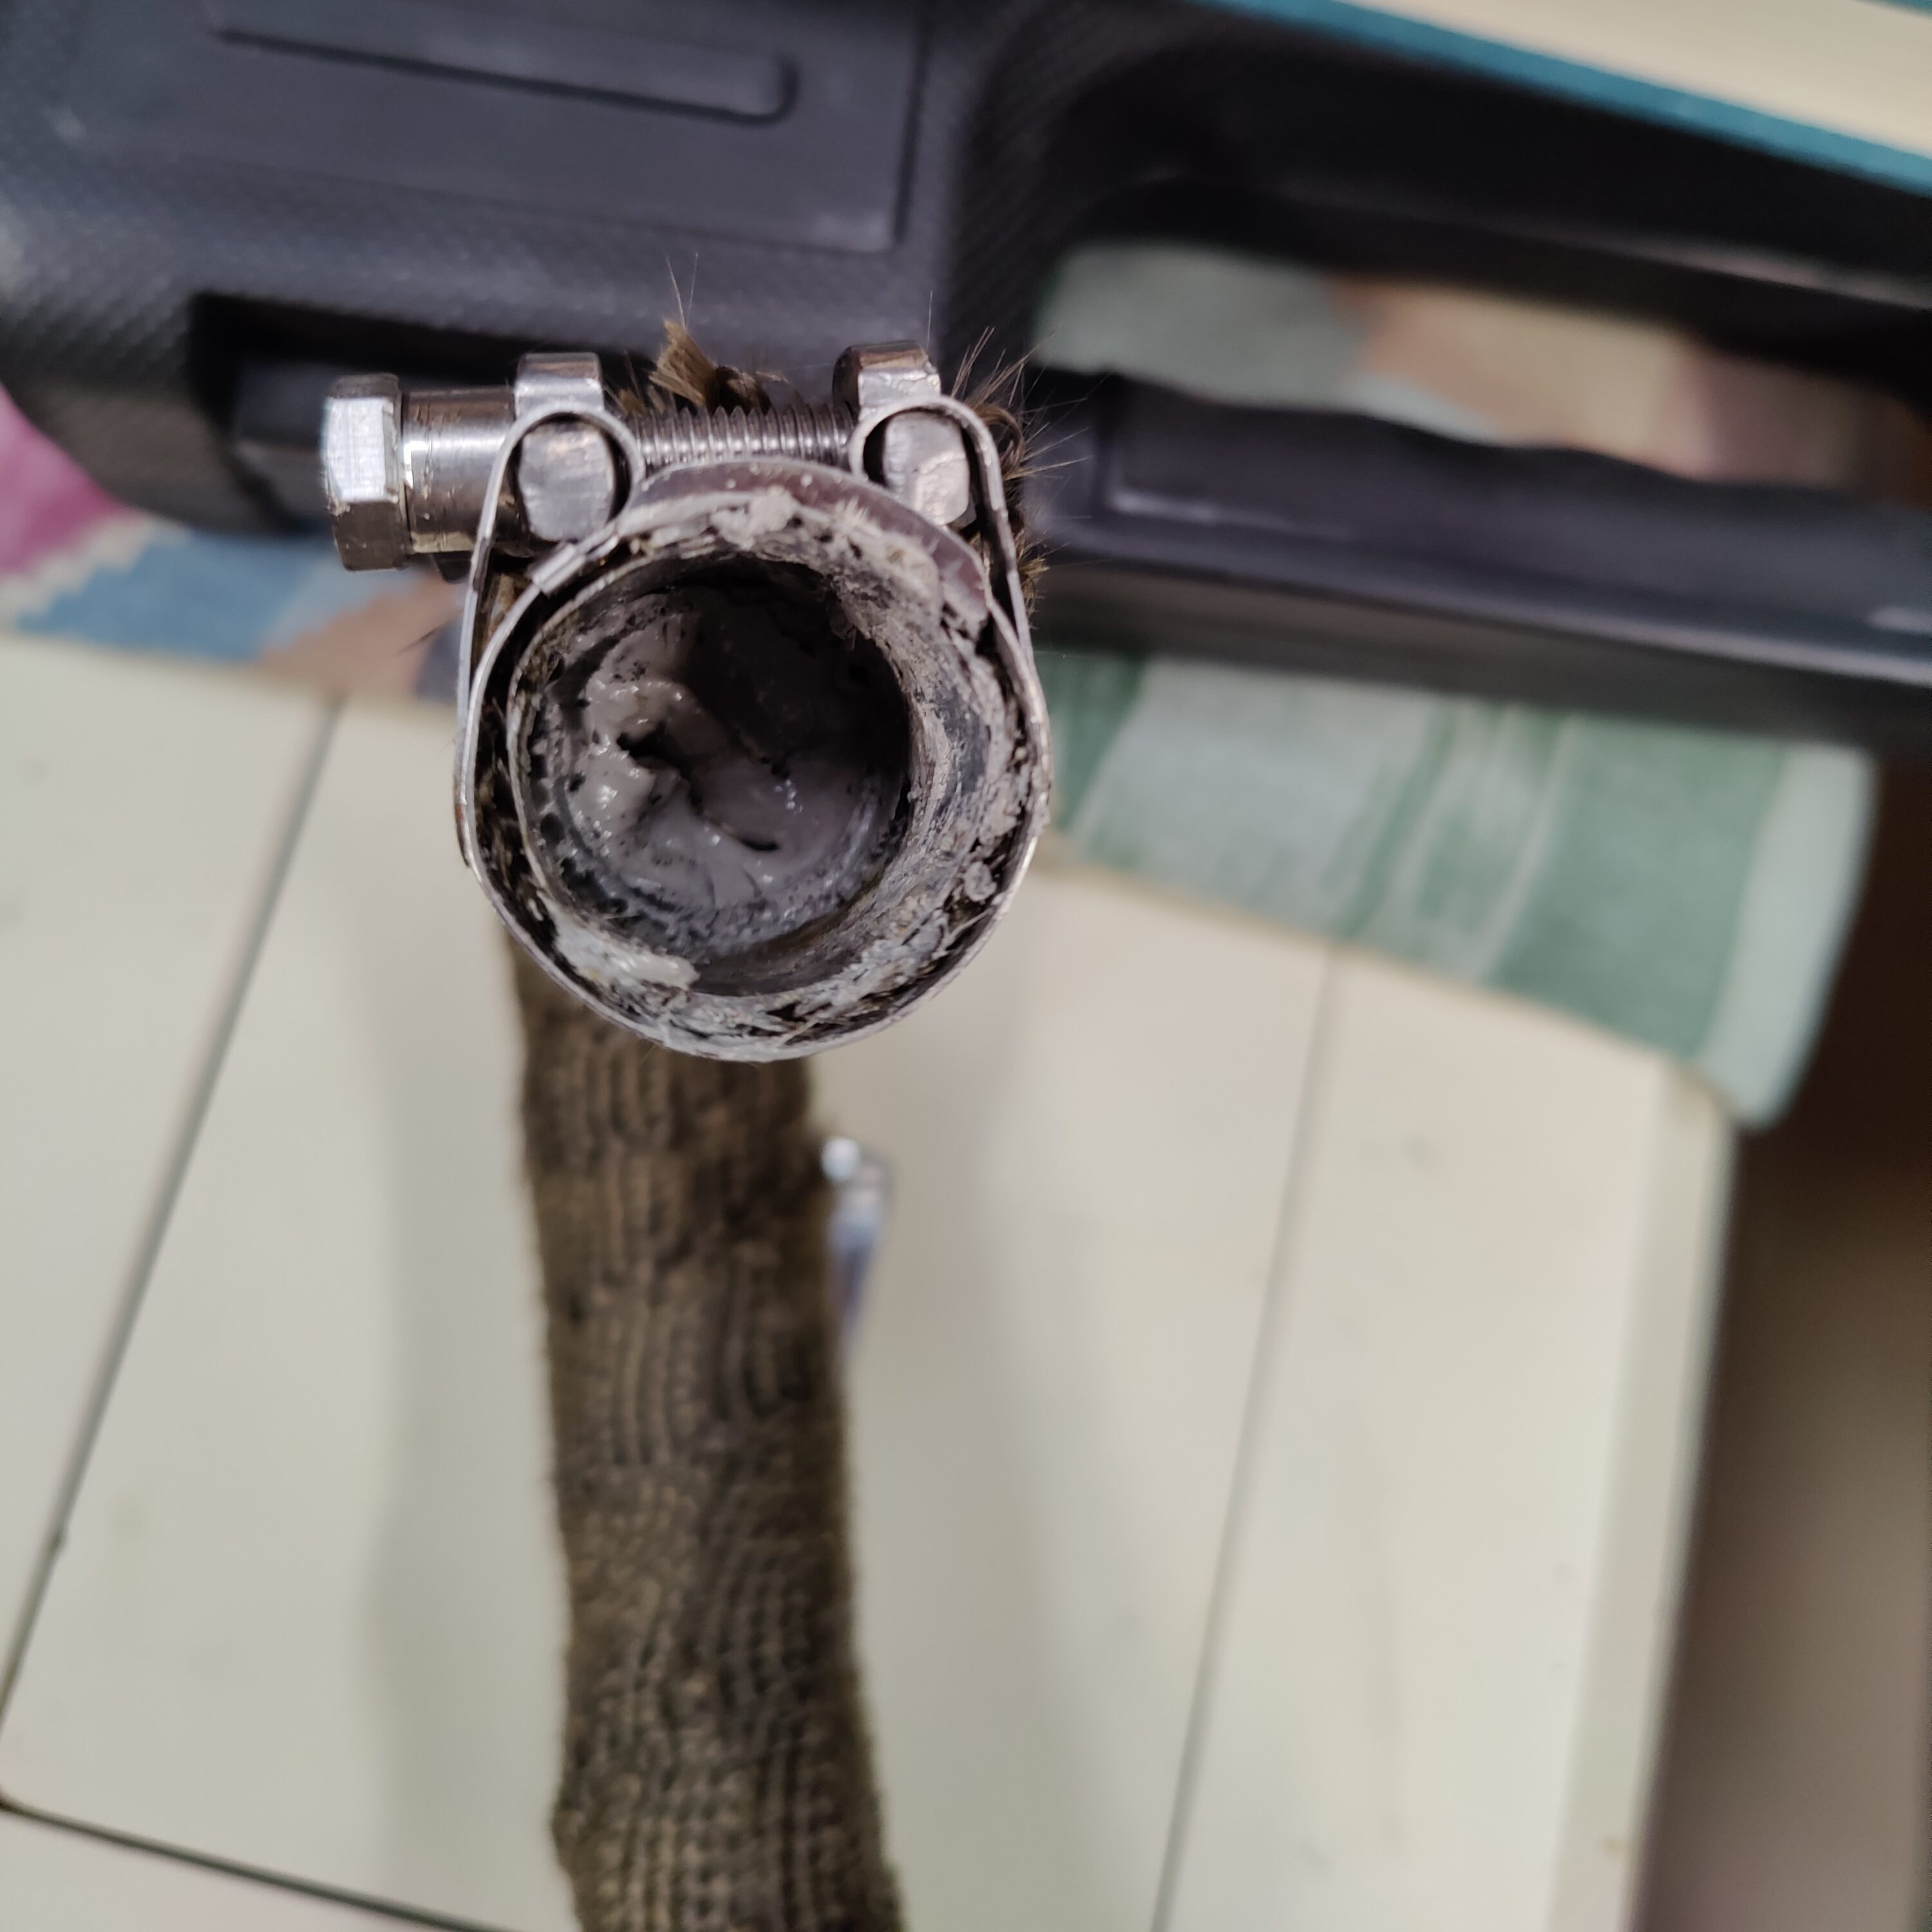
When we fired up the heater for the first time after all the effort and swearing to get it installed permanently, of course it shot white exhaust everywhere and then didn’t start. “Great, we have too long of, or too complicated of an exhaust run. We are going to have to rethink this whole thing after having drilled big holes all over the boat”, I was thinking. Interestingly though I did discover at some point when dismantling the heater initially that we had actually clogged up the exhaust pipe. So the next day I took the exhaust off our final install, not a very fun process, to inspect.
Sure enough, there was serious cloggage caused by the extreme amount of Permetex I had put at the seal to ensure exhaust didn’t leak. While our exhaust still has some pretty extreme bends and angles to it, I was hopeful that clearing this all out would help out situation. I dug that hardened glob out and then shot water through the exhaust pipe both directions to make sure it was as clear as I could make it without bending the whole thing straight.
After reinstalling the newly cleared exhaust, the heater fired right up! Holy hell that was satisfying as the whole journey we had in getting the heater installed came together in such a way we can now use the heater all we want, and if anything goes wrong we should be able to diagnose what the issue is and get it fixed.
We’ve had it installed a little while now and we now understand why people rave about these things. It fires up quickly but only just sips diesel. The whole boat slowly rises in temperature, much different than the pointed heat of an electric space heater, making it more possible to just enjoy hanging around in the entire boat instead of right in front of the space heater. Being that the heater is inside, the air is cycled through which dries the air our significantly. In the winter here in the PNW if the boat is left with the hatches opened the interior humidity is around 74%. After 20 minutes of the heater running its at the low 60s and it steadies out after about an hour in the mid 50s!
This changes the game in terms of cruising. As this can run without issue while sailing, we can now head off in the fog, stay warm and keep things dry inside while someone is outside steering. Once at some northern anchorage we can keep the heater cranking and further enjoy the ability to be somewhere AT&T hasn’t found on a map yet and not fret about having the option of only staying in our newly redesigned V-Berth, article to come soon….

Leave a comment